
Feeling the sting of high winter energy bills? The solution isn’t just turning down the heat and sacrificing comfort. The real key to significant savings lies in identifying and fixing a series of hidden inefficiencies and misunderstood energy myths throughout your home. This guide reveals how small, strategic changes—from how you arrange your furniture to when you run your dishwasher—can cut your costs without you ever needing to feel cold.
As winter settles in, the familiar dread of the monthly heating bill arrives with it. For many families struggling with rising energy prices, the default advice is always the same: turn down the thermostat, layer up, and endure a chilly house. While these actions have their place, they often feel like a losing battle against the cold and a constant sacrifice of comfort. We’re told to buy expensive smart thermostats or invest in massive insulation projects, but what if there were immediate, low-cost solutions hiding in plain sight?
The common wisdom focuses on the most obvious culprit—the temperature you set. But what if the biggest energy drains aren’t related to your thermostat setting at all? What if your well-intentioned habits and even your modern « smart » home are quietly working against you, creating a baseline of energy waste that inflates every single bill? This is where true, sustainable savings are found: not in shivering, but in being smarter about how your home uses and loses heat.
This article will challenge those common assumptions. We’ll adopt a new perspective: instead of focusing on the thermostat, we’ll become energy detectives, hunting down the hidden leaks, inefficient habits, and counter-intuitive truths that are costing you money. We’ll explore why turning your heat off completely can sometimes backfire, how a simple roll of tape can be more effective than a new gadget, and why your living room layout might be your biggest energy enemy. Get ready to take back control of your energy bills, one smart, simple fix at a time.
In this comprehensive guide, we’ll walk through a series of practical, evidence-based strategies to reduce your energy consumption. From understanding the physics of heat in your home to optimizing your appliance usage, each section provides actionable advice to help you achieve significant savings.
Summary: Your Guide to Smarter Home Energy Savings
- Why Turning Your Heating Off Completely During the Day Can Cost You More?
- How to Identify and Seal Window Drafts for Less Than $20?
- A+++ vs A+: Is the Extra $200 for the Top Fridge Model Worth It?
- The Interior Design Error That Blocks 30% of Your Heat Source
- When to Run Your Dishwasher to Benefit from Off-Peak Tariffs?
- Why Your « Smart » Home Might Be Increasing Your Electricity Base Load?
- Why Solar Panels Without a Battery Won’t Save You During a Blackout?
- How to Calculate if Solar Panels Will Actually Pay Off for Your Roof?
Why Turning Your Heating Off Completely During the Day Can Cost You More?
It sounds like the ultimate energy-saving move: if no one’s home, turn the heating system off entirely. Why pay to heat an empty house? This logic, however, often ignores a crucial concept: thermal inertia. Your home’s structure, furniture, and all its contents act like a thermal battery. They absorb and store heat. When you turn the heating off in cold weather, the entire mass of your home cools down significantly.
When you return and switch the heating back on, the system doesn’t just have to heat the air; it has to work overtime to reheat the walls, floors, and furniture. This massive « rebound effect » can force your furnace or heat pump to run at maximum capacity for an extended period, potentially using more energy than it would have to simply maintain a lower, stable temperature throughout the day. While thermostat setbacks are proven to work— the U.S. Department of Energy estimates 10% savings for turning your thermostat back 7°-10°F for 8 hours a day—turning it completely off is a different story, especially in poorly insulated homes.
The efficiency of this strategy depends heavily on your home’s insulation and your heating system type. A well-insulated, modern home might handle it well, but an older, drafty house will lose heat so fast that the recovery energy cost will be substantial. The smarter approach is not to turn it off, but to set it back to a conservative temperature (e.g., 55-60°F or 13-15°C) that prevents the deep chill and minimizes the energy needed to restore comfort.
How to Identify and Seal Window Drafts for Less Than $20?
Before you even think about complex solutions, the single most effective and low-cost action you can take is to tackle air leaks. Drafts are the sworn enemy of a warm home, acting as tiny, open doors that constantly let cold air in and push your expensive warm air out. The EPA estimates homeowners can save an average of 15% on heating and cooling costs just by air sealing and insulating. Finding these drafts doesn’t require expensive equipment; a few simple household items are all you need.

As the image above illustrates, one of the oldest and most effective methods is the candle test. On a windy day, or with an exhaust fan running to create negative pressure, slowly move a lit candle or incense stick around the edges of your windows, doors, and electrical outlets. A flickering or bending flame is a sure sign of an air leak. Once you’ve found the culprits, the solutions are surprisingly affordable and easy to install.
You don’t need to be a DIY expert to make a huge difference. Most of the materials required are available at any hardware store for just a few dollars and are designed for easy application, making this a perfect weekend project that pays for itself in the first month.
Your Action Plan: DIY Window Draft Sealing for Under $20
- Detection: Use the candle flame test. Slowly move a lit candle around window frames, doors, and outlets. Mark spots where the flame bends or flickers with sticky notes.
- Weatherstripping: Apply self-adhesive foam or rubber weatherstripping ($5-15) to the moving parts of windows (sashes) and door frames for a tight, removable seal.
- Caulking: For non-moving parts like the exterior trim of a window, apply a bead of exterior-grade caulk to fill any visible gaps. For renters, removable rope caulk is a great temporary option for interior gaps.
- Window Film: Install a clear plastic shrink film kit ($10-15). This creates an insulating air barrier over the entire window and is nearly invisible once installed with a hairdryer.
- Outlet Gaskets: Don’t forget walls. Install pre-cut foam gaskets ($5 for a pack) behind the cover plates of electrical outlets and light switches on exterior walls to stop these common, hidden drafts.
A+++ vs A+: Is the Extra $200 for the Top Fridge Model Worth It?
When an old appliance dies, the temptation is often to grab the cheapest replacement available. However, in the world of appliances, the upfront price tag tells only a fraction of the story. The real cost is the total lifecycle cost—the purchase price plus the energy it consumes over its 10-15 year lifespan. This is where understanding energy efficiency ratings becomes a powerful financial tool. An appliance with a higher rating, like A+++ or an ENERGY STAR certification, might cost $200 more, but is that investment worthwhile?
The answer almost always is yes. According to official sources, Energy Star certified appliances use 10-50% less energy than standard models. For a refrigerator, which runs 24/7, these savings accumulate quickly. The key is to calculate the « payback period »—the time it takes for the energy savings to cover the extra upfront cost. To do this, you need three pieces of information:
- The annual energy consumption (in kWh) of both the standard and the high-efficiency model. This is listed on the EnergyGuide label.
- The price difference between the two models.
- Your local electricity rate (in dollars per kWh), which you can find on your utility bill.
With these numbers, the calculation is simple: First, find the annual energy savings in dollars. Then, divide the extra upfront cost by the annual savings to find the payback period in years. For example, if a new fridge saves you $60 per year in electricity and costs $180 more, the payback period is three years. For the remaining 10+ years of its life, that $60 per year is pure profit in your pocket. Don’t forget to also check for local utility rebates, which can further shorten this payback period significantly.
The Interior Design Error That Blocks 30% of Your Heat Source
One of the most common and costly energy mistakes has nothing to do with technology and everything to do with interior design: placing large furniture directly in front of your heat sources. That cozy-looking sofa pushed up against the radiator or the big armchair in front of a heating vent might feel comfortable, but it’s creating an invisible wall that sabotages your home’s heating efficiency.
Heating systems, especially radiators and baseboard heaters, work through a process called convection. They heat the air directly around them, causing it to rise. This pulls cooler air from the floor towards the heater, creating a natural circulation loop that distributes warmth throughout the room. When you place a sofa or a thick bookcase in front of a radiator, you block this loop. The heater ends up super-heating a small, trapped pocket of air between the furniture and the wall, while the rest of your room remains chilly. This forces your heating system to run longer and harder to reach the temperature set on your thermostat, wasting a significant amount of energy.
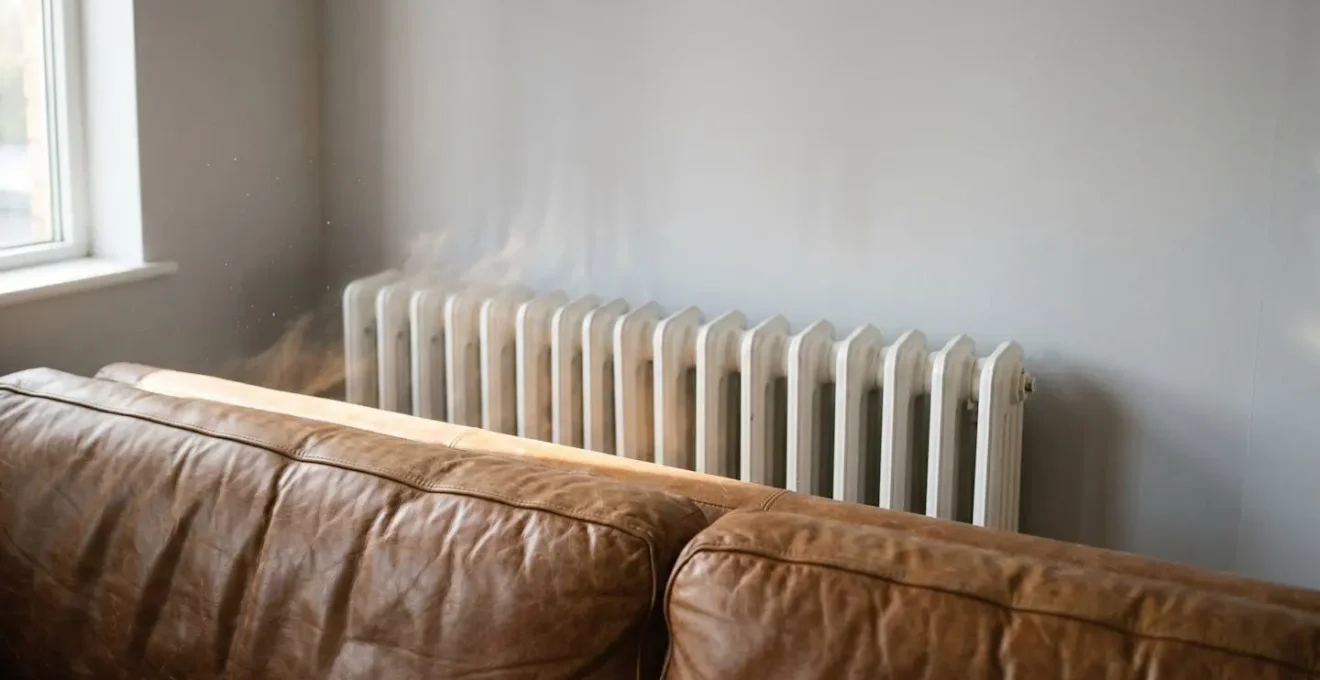
The solution is simple and free: pull your furniture away from heat sources. A clearance of just 8-12 inches (20-30 cm) can be enough to restore the convection current and allow warm air to circulate freely. The same principle applies to floor-length curtains. Ensure they end above radiators or are tucked behind them to avoid trapping heat against cold windows. Even decorative radiator covers can be problematic; studies show that poorly designed radiator covers can cause heat loss ranging from 5% to 25%.
When to Run Your Dishwasher to Benefit from Off-Peak Tariffs?
Many utility companies are shifting to « Time-of-Use » (TOU) or « off-peak » electricity rates to manage grid demand. Under these plans, the price you pay for electricity changes throughout the day. It’s most expensive during « peak » hours when demand is highest (typically late afternoon and early evening) and cheapest late at night or in the middle of the day. For families with these plans, *when* you use your high-wattage appliances becomes just as important as *which* appliances you use. This strategy is a form of energy arbitrage: shifting your consumption to low-cost periods to save money.
The dishwasher, clothes dryer, and electric vehicle charger are prime candidates for this strategy. Most modern dishwashers and washing machines have a « delay start » feature for exactly this purpose. Instead of running a load right after dinner during peak hours, you can set it to start at 2 a.m. when electricity is cheapest. While a single dishwasher cycle won’t make a huge difference, making this a consistent habit across all major deferrable appliances can lead to noticeable savings on your monthly bill. The key is knowing which appliances have the biggest impact.
The following table ranks common household appliances by their typical power draw, highlighting which ones are the highest priority to shift to off-peak hours for maximum savings. Focus your efforts on the « Highest » and « High » priority items first.
| Appliance | Typical Wattage | Deferrable to Off-Peak? | Priority for Shifting |
|---|---|---|---|
| Electric Vehicle Charger | 3,000-7,000W | Yes | Highest |
| Clothes Dryer (Electric) | 3,000-5,000W | Yes | High |
| Water Heater (Electric) | 3,000-4,500W | Partial (with timer) | High |
| Washing Machine | 500-2,000W | Yes | Medium |
| Dishwasher | 1,200-1,500W | Yes | Medium |
| Space Heater | 1,500W | No (comfort needed) | Low |
Why Your « Smart » Home Might Be Increasing Your Electricity Base Load?
Smart plugs, voice-activated speakers, Wi-Fi light bulbs, and connected cameras promise a future of convenience and efficiency. However, each of these devices contributes to a growing problem: phantom load, also known as vampire power. This is the electricity consumed by electronics when they are in standby mode—not actively being used, but still drawing power to listen for a command, maintain a network connection, or display a status light. While the draw of a single smart plug is minuscule, the cumulative effect in a modern home can be shocking.
Research from organizations like the Natural Resources Defense Council (NRDC) highlights this issue. A home with 20-30 smart devices can easily have a continuous phantom load of 30-60 watts. This is the energy equivalent of leaving a large television running 24 hours a day, 7 days a week. This constant drain creates a high « base load » of electricity consumption that you pay for before you even turn anything « on. »
Furthermore, the very infrastructure that makes a smart home work—the modem, router, and any mesh network nodes—are themselves significant energy consumers designed to be on all the time. The convenience of a smart home is undeniable, but it’s important to be aware of this hidden cost. When choosing smart devices, look for those with low standby power consumption. Grouping non-essential entertainment devices (TV, game console, speakers) onto a single smart power strip that you can turn completely off when not in use is an effective way to slay these energy vampires and lower your electricity base load.
Why Solar Panels Without a Battery Won’t Save You During a Blackout?
It’s a common and logical assumption: if I have solar panels on my roof generating electricity, I should have power during a blackout, right? Unfortunately, for the vast majority of grid-tied solar systems, the answer is no. When the utility grid goes down, your solar panel system will automatically shut down with it, leaving you in the dark just like your neighbors.
This isn’t a flaw in the system; it’s a critical safety feature called « anti-islanding. » Imagine a scenario where a utility worker is repairing a downed power line they believe to be de-energized. If your solar system were still active, it would be sending electricity back into the grid, creating an « island » of live power. This could be fatal for the worker. To prevent this, all grid-tied inverters are required by law to have this automatic shutdown capability. They constantly monitor the grid’s frequency and voltage, and the moment they detect an outage, they stop exporting power.
The only way to have backup power from your solar panels during a blackout is to pair them with a battery storage system and a special « smart » inverter or transfer switch. In this setup, when the grid fails, the system disconnects from the grid and uses the battery to create its own stable, independent microgrid for your home. This allows you to run essential circuits using the power stored in your battery and generated by your panels, but it adds significant cost and complexity to the installation.
Key Takeaways
- True energy savings come from fixing hidden inefficiencies, not just lowering the thermostat.
- Simple, low-cost actions like sealing drafts and rearranging furniture offer a high return on investment.
- Understanding concepts like thermal inertia, phantom load, and appliance lifecycle cost empowers you to make smarter financial decisions.
How to Calculate if Solar Panels Will Actually Pay Off for Your Roof?
Moving beyond small tweaks, solar panels represent a major investment in your home’s energy future. While they promise long-term savings and environmental benefits, the financial viability depends entirely on your specific circumstances. A glossy sales brochure isn’t enough; you need to run the numbers yourself to determine if solar is a smart financial move for your family. Calculating the Return on Investment (ROI) isn’t as complicated as it seems and boils down to a few key factors.
First, you need to estimate the total upfront cost. This is driven by the system size (measured in kilowatts, or kW) you need, which depends on your annual electricity consumption. Next, you must calculate the system’s potential annual production. This is influenced by your roof’s orientation (south-facing is ideal in the northern hemisphere), its angle, any shading from trees or buildings, and the average number of sunny days in your location. Online tools like Google’s Project Sunroof can provide a good preliminary estimate.
Once you know how many kilowatt-hours (kWh) the system will produce annually, you can calculate its value by multiplying that number by your average electricity rate. Finally, subtract any available government incentives, like federal tax credits or local rebates, from the initial cost. The simple payback period is your net cost divided by your annual electricity savings. If a $15,000 system (after incentives) saves you $1,500 per year on bills, the payback period is 10 years. With panels warrantied for 25 years, that’s 15 years of free electricity.
By moving from small, behavioral changes to a thorough analysis of major investments, you can build a comprehensive strategy that puts you in complete control of your energy costs. The next logical step is to apply this knowledge and begin assessing which of these solutions will deliver the biggest impact for your specific home.